 |
| Progress on the layout is coming along! |
For me, making scenery is the best part of model railroading. Benchwork, track laying and wiring are just things you have to do to get to the really good stuff.
Scenery on the N scale Thompson River Canyon Sub. is all made from extruded Styrofam (as is everything else on the layout, except for the door the subroadbed is glued on).
There are at least two ways of using Styrofoam for scenery. One popular method
is the sandwich—gluing layers of Styrofoam in general scenic shapes and then
carving it to the finished shape.
The other is the sheet method—lay the Styrofoam vertically along a wall (or the scenic divider, in this case) and carve into it. I used this method.
 |
| The canyon walls under construction. |
(I
did use the sandwich method in one corner, since that was the best way to
achieve the desired effect of a gully the track went through.)
After selecting a length of one foot high Styrofoam, I first cut an angle on the bottom so it could lay back against the divider at a slight angle.
After selecting a length of one foot high Styrofoam, I first cut an angle on the bottom so it could lay back against the divider at a slight angle.
Next,
I cut fissures and cracks into the sheet to represent the sides of the
canyon walls. For this I used an old serrated kitchen knife that was good at
carving out chunks of Styrofoam.
 |
| Behind the scene . . . |
While cutting and shaping the walls, I saved some small pieces cut off the Styrofoam. These came in handy later as rocks or filler pieces. There were many more pieces than I could use, so I didn't save them all.
For more delicate shaping, I used a box cutter knife and a Stanley surform shaver. The idea was to make the Styrofoam look like a canyon wall that had been eroded over time.
 |
| I used the sandwich style in the corner. |
(While doing this, I made sure to have my Shop-Vac nearby to vacuum up the little pieces and dust from all that cutting.)
When
I was happy with the general shape, I used white glue to affix the sheets to
the subroadbed. I pushed one-inch nails into the bottom of the sheets (toe-nail style) to hold
them to subroadbed while the glue dried. I left some nails in for
added stability.
Later, I also glued some blocks of Styrofoam behind the sheets to provide added strength and stability.
Later, I also glued some blocks of Styrofoam behind the sheets to provide added strength and stability.
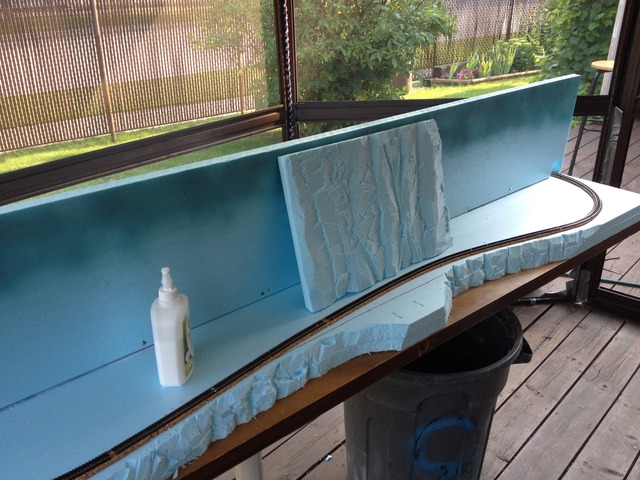 |
| Test-fitting a piece of Styrofoam for the canyon wall. |
To hide the seams between the sections of Styrofoam, I used spackling paste. This also covered up any nail holes.
For the tunnel section in the middle of the layout, I glued three pieces of Styrofoam together vertically and then glued them to subroadbed and divider. (After cutting a hole for the trains to pass through, of course.)
Next, I used the old kitchen knife, the box cutter and surform shaver to shape the tunnel section into something that I felt look organic to the scene.
For this, I used a photo of
the real canyon as a guide. I took me a number of tries before I got the shape I
wanted.
 |
| A close-up of the wall and tunnel under construction. |
Once everything was in place, I went back and did more shaping and cutting, trying to come up with a look that felt realistic. A bit more spackling paste, and then it was ready for the next step: Painting!
Previous Post: Getting Started.
To view all the posts in this series, click here: Thompson River Canyon.
 |
| Ready for painting! |
Looks awesome! Nice job!
ReplyDeleteThe rocks look extremely realistic - great work!
ReplyDelete