Tuesday, September 29, 2015

Tibetan Prayer Wheels and Model Railroading, and a Life in Boxes


A couple of random thoughts following last weekend's Manitoba Mega Train show . . . .

A Life in Boxes

Next to me at the show was my friend Marvin Fetch. He was selling another estate, this time that of long-time local model railroader Bill Morrison.

Bill, who died last April, amassed an enormous collection of model railroad items--over 200 passenger cars and over 1,000 freight cars, along with many locomotives. 

There were so many boxes at the sale that Marvin couldn't put everything out all at once; he was constantly going behind or underneath the tables looking for things.

Not to get too philosophical or anything, but as I watched Bill's cherished collection being sold, I had to think: This is how it often ends. 

During our lives we accumulate locomotives, cars and other things for our layouts then, one day, when we die, it's all in boxes at a train show.

Bill's widow, Anne, was fortunate to have someone like Marv to come along to help her sell his trains. It was a huge task, going through his stuff; not everyone is so lucky.

As for me, I have created a list of all my trains, with suggested prices, and have asked a friend to sell them for me should I pass away before I can do it myself. It's the least I can do for my family, to make things easier for them.
 
Oh, and if that happens, I could be like my friend Harold Weston, who left a parting gift for those who had the sad task of tearing down his layout after his death. 

When they took down the mountain scene that dominated his O scale pike, they found a hidden bottle of fine whiskey with a note. 

The note said that if someone was reading it, that meant Harold was dead, and thanks for helping to take down the layout--and please have a toast for and on him. 
 
Tibetan Prayer Wheels and Model Railroads
 
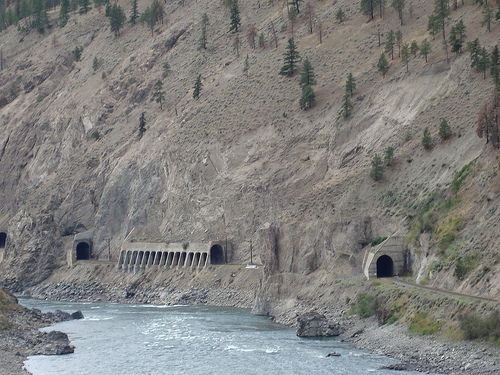
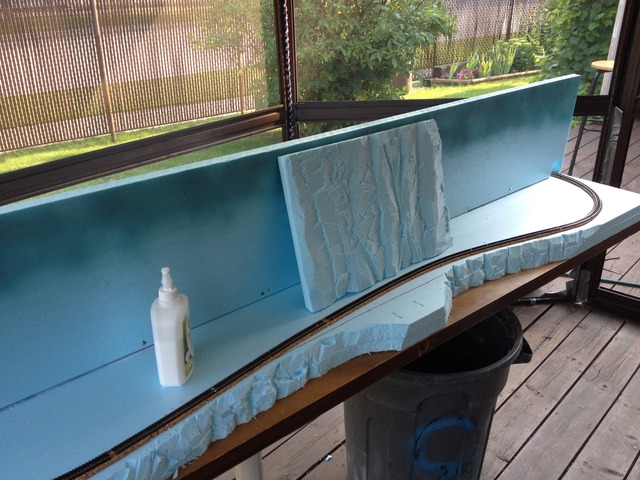
As I have written on this blog, I built the N scale Thompson River Canyon layout in memory of my brother-in-law, Ken Epp. I unveiled the layout at last weekend's show.
 
As I watched the train go around and around (and around and around again), I felt a sense of peace. There was almost a spiritual quality to it, a settling of the soul as I watched the train pass by. It almost made me wonder if it could be a meditative practice.
 
And that made me think of Tibetan Buddhist prayer wheels. Adherents of this religion place a prayer inside these hand-held instruments, which have a weight attached with a chain. They then twirl them around. Each time the wheel turns, the prayer inside is believed to be prayed.
 
Since the layout was in memory of my brother-in-law, I got to wondering if it couldn't also be seen as a form or prayer (especially if I was a Tibetan Buddhist).
 
By my calculations, the train went around the loop of track over 1,900 times in the two days. If it was a model railroad prayer wheel, that would be a lot of prayers for Ken!
 
(Speaking of Tibetan Buddhism, check out my post about how a model railroad is like a Tibetan sand mandala.)

Anyway, those were some of the thoughts that came to me at the train show, and as I watched the train go around and around, and as I watched Bill's lifetime of collecting be sold piece by piece.

Saturday, September 26, 2015

Thompson River Canyon: On Display for the First Time at the Manitoba Mega Train Show


The layout was a hit with the kids.


It was a successful first day at the Manitoba Mega Train Show, where I unveiled the Thompson River Canyon portable layout.

Even though the weather was great, attendance was good--even higher than the first day last year.

The layout on display.


It was good to talk to friends about my brother-in-law, Ken Epp, and remember him and his interest in the hobby.

It was also good to watch the kids watch the train go round-and-round. I discovered (again) that kids really like tunnels; they would watch it disappear and appear again and again and again.


There was even some visiting power on the layout, courtesy of an N scale friend at the show.

The show runs again tomorrow, after which I will take a break from working on it. My goal is to complete the other side in time for the April, 2016 Winnipeg Model Railroad Club annual spring show.

Speaking of which, I realize I haven't posted a photo of what the other (unfinished) side of the layout looks like; find it below. The finished side looked like this just six weeks ago.

To view all the posts in this series, click here: Thompson River Canyon.

The unfinished side.


The finished side.


The reason for making it.

Thursday, September 24, 2015

N scale Thompson River Canyon 6: Conclusion


Now for the fun part—painting the scenery!

But first, this note: Many modellers who use extruded Styrofoam for scenery cover it with plaster cloth or some kind of goop before proceeding to the final step.

I have never understood why they do that; painting directly on to the Styrofoam has always worked just fine for me.

Besides, with a portable layout like this, the goal was to keep it light—not add extra weight from plaster cloth or goop.

Choosing the Paint

Like I did with my HO layout, before starting to paint I checked out the mistake section of my local home renovation store. Sometimes you win, and sometimes you lose—I won this time. here was a litre of mis-tinted grey/beige paint for sale for a fraction of the regular price. I used this as a base paint.


I also bought some cheap acrylic paint at the dollar store: White, black, burnt umber, and brown.

Painting the Canyon Wall

My goal was to create a canyon that was mostly beige/grey, but not uniform in colour. Depending on what time of day a photo of the canyon was taken, or in exactly what area, the colours can vary—some photos make it look very light grey, others are more multi-hued. I decided to go for the latter.


Top view, showing what it looks like to have a
one-foot high canyon wall in N scale.


I started by putting on some of the base paint, then squirted on white, brown or black to add colour. 

My first attempts were too dark, so I went back and lightened them up. Fortunately, this kind of painting is very forgiving. Don’t like it? Do it again?

When the paint was wet, I sprinkled on a bit of green ground foam. At first, I added too much—there is very little vegetation in this part of the canyon. When it was dry I scraped some of it off. There may still be too much, though.

When the paint was dry, I dry-brushed on some white and light grey to highlight features in the canyon wall. I also added other highlights where I thought it could be helpful.


The view looking up.


At the left end, I added a number of Styrofoam “rocks” and “boulders.” (Those pieces I saved when shaping the wall.) I made this area mostly grey for contrast.

Overall, I think the effect is good, even if not exactly like the prototype. Best part is that if I want to change it, I can just start over again!


Painting and Ballasting the Track

After the canyon walls were painted, I painted the track. For me, this is possibly one of the more critical things any modeler can do to try to achieve some semblance of plausibility on a layout.

In my mind, nothing says “toy” louder than unpainted track. Visitors may not know much about scenery, trains or structures, but everyone knows that track isn’t silver.

I painted the track with a mixture of black and brown. Only one side is painted, since that is all you can see.


After the paint on the track was dry, I added ballast.

I used a mixture of grey, black (cinders) and brown for my ballast. I find that using a mix prevents the ballast from looking to uniform and tidy. In this case, I mixed three parts grey with one part black and one-half part brown.

I affixed the ballast with my usual method of “wet” water and diluted white glue.

After the track was painted and ballasted, I glued the sheds to the layout.

Painting the Water

For the river, I used a mix of Ceramcoat black green and deep river green. These paints are a bit more expensive, and available only at a craft store, but worth it to achieve the look of a realistic river.


I painted deep river green, which is lighter, along the shore, to suggest that it isn’t as deep, then painted black green out to the edges of the layout.

When done, I put on a coat of gloss medium to make the river look wet and shiny.

Again, depending on the time of day, and whether it is overcast or sunny, the colour of the river can vary. This seemed like a good choice for me. Plus, I already had those paints on hand from my HO layout!

Next . . . 

Next up, I will finish the other side of the layout. This will represent a part of the canyon where the walls are less steep and the ground more beige and sand colour. That will be my winter project.


Overview of the layout.


And there you have it: The Thompson River Canyon in N scale. It took me just over a month to build the layout and complete this scene. It's nothing special, and not especially elaborate. But I think it conveys the impression of the prototype that I am trying to make.

And it helps me to remember and honour my brother-in-law, Ken Epp—which I will do this weekend when the layout is unveiled at the annual Mega Train Show here in Winnipeg.

My brother-in-law, Ken Epp, at last years Mega Train
Show, a few weeks before he died.


Read the previous post about making the canyon walls.

To view all the posts in this series, click here: Thompson River Canyon. 


Sunday, September 20, 2015

N Scale Thompson River Canyon 5: Building the Snow/Rock Sheds


On my HO scale layout, I subscribe to the three foot rule (or 0.9144 meters, as we say in Canada): The trains, and everything else, look best from three feet away.

The same holds true for the Thompson River Canyon N scale layout, but I think that I might want to increase it to six feet!

The reason for this is two-fold: First, my modeling skills, and related to that, second, the snow/rock sheds.

I will be the first to admit that the snow/rock sheds I built are not like the prototype. But that’s OK: 

An area that inspired me.


My goal with the layout was to create something that represented the canyon, not be exactly like it.

(As I have said before on this blog, my goal in model railroading is plausibility, not realism.)

That out of the way, I made the snow/rock shed and tunnel portals out of cardstock.

Another area that inspired me.


Making the Sheds

There’s nothing elaborate about these models; after eyeing-up what I wanted to make, I cut the cardstock to shape with a box cutter knife.

To present the illusion that the supports are thicker than they really are, I cut another piece of cardstock at an angle and glued it to the inside of the snow/rock shed.

Test-fitting the shed on the layout. 


In addition to making the supports look thicker, I also angled them out more like the prototype.

When done, I spray painted the sheds with grey primer to help with painting later.

Next, it was time for the roofs. They are also made from cardstock, cut by eye to fit the canyon wall. I added supports on the shed supports to help with gluing them down.

Since it was impossible to get a perfect fit along the walls, after they were glued to the supports I used small cardstock and Styrofoam pieces to fill the gaps. Later, I added ballast to cover the area.

Painting the Sheds

Painting concrete is always a trick for me. It isn’t grey—it’s more whitish, with grey and brownish hues. I used a mix of white, black and brown to come up with the colours you see.

I added a mixture of grey, black and brown ballast (both fine and medium) to the roofs of the sheds to simulate rock fall. I affixed the ballast with diluted white glue.

Before painting and ballasting.


In order to disguise the sharp radius curve coming out of backdrop, I followed the prototype and made a different kind of snow/rock shed out of Styrofoam. The portal is also made from cardstock. After painting, I glued ballast on top of it.

Before installing the sheds, I painted the canyon and painted and ballasted the track. But that’s for the next post!


Previous Post: Making the Canyon.

Next post: Painting.

To view all the posts in this series, click here: Thompson River Canyon. 

Thursday, September 17, 2015

N Scale Thompson River Canyon 4: Making the Canyon


Progress on the layout is coming along!


For me, making scenery is the best part of model railroading. Benchwork, track laying and wiring are just things you have to do to get to the really good stuff.

Scenery on the N scale Thompson River Canyon Sub. is all made from extruded Styrofam (as is everything else on the layout, except for the door the subroadbed is glued on). 

There are at least two ways of using Styrofoam for scenery. One popular method is the sandwich—gluing layers of Styrofoam in general scenic shapes and then carving it to the finished shape.

The other is the sheet method—lay the Styrofoam vertically along a wall (or the scenic divider, in this case) and carve into it. I used this method. 

The canyon walls under construction.


(I did use the sandwich method in one corner, since that was the best way to achieve the desired effect of a gully the track went through.)

After selecting a length of one foot high Styrofoam, I first cut an angle on the bottom so it could lay back against the divider at a slight angle.

Next, I cut fissures and cracks into the sheet to represent the sides of the canyon walls. For this I used an old serrated kitchen knife that was good at carving out chunks of Styrofoam.

Behind the scene . . . 


While cutting and shaping the walls, I saved some small pieces cut off the Styrofoam. These came in handy later as rocks or filler pieces. There were many more pieces than I could use, so I didn't save them all.

For more delicate shaping, I used a box cutter knife and a Stanley surform shaver. The idea was to make the Styrofoam look like a canyon wall that had been eroded over time. 

I used the sandwich style in the corner.


(While doing this, I made sure to have my Shop-Vac nearby to vacuum up the little pieces and dust from all that cutting.)

When I was happy with the general shape, I used white glue to affix the sheets to the subroadbed. I pushed one-inch nails into the bottom of the sheets (toe-nail style) to hold them to subroadbed while the glue dried. I left some nails in for added stability.

Later, I also glued some blocks of Styrofoam behind the sheets to provide added strength and stability.

Test-fitting a piece of Styrofoam for the canyon wall.


To hide the seams between the sections of Styrofoam, I  used spackling paste. This also covered up any nail holes.

For the tunnel section in the middle of the layout, I glued three pieces of Styrofoam together vertically and then glued them to subroadbed and divider. (After cutting a hole for the trains to pass through, of course.)

Next, I used the old kitchen knife, the box cutter and surform shaver to shape the tunnel section into something that I felt look organic to the scene. 

For this, I used a photo of the real canyon as a guide. I took me a number of tries before I got the shape I wanted.

A close-up of the wall and tunnel under construction.


Once everything was in place, I went back and did more shaping and cutting, trying to come up with a look that felt realistic. A bit more spackling paste, and then it was ready for the next step: Painting!


Previous Post: Getting Started.

To view all the posts in this series, click here: Thompson River Canyon. 

Ready for painting!

Wednesday, September 16, 2015

Canadian Railway Modeller Available on DVD


One thing that has given me a lot of satisfaction as a model railroader was being associated with Canadian Railway Modeller--first as a volunteer, later as Associate Editor.

I saw the publication rise from a dream held by Winnipegger Morgan Turney to a small, but important and influential, player on the North American model railroad scene.

Since that time, CRM has highlighted and promoted Canadian model railroaders, layouts and manufacturers.

Over the years, it also shown  the major U.S. manufacturers that there is a strong and healthy market for items in Canadian schemes--both in Canada and in the U.S.

As a result, the past number of years have been a golden age for those who model Canadian railroads. Atlas, Athearn, Bowser, InterMountain and, of course, Rapido have all brought out great looking and great running locomotives and rolling stock.

A lot has changed since Morgan brought out that first issue, both in model railroading and in the world of publishing.

It has never been easy to publish a small niche magazine, but today it is even harder, what with everyone going online for news and information.

Yet somehow CRM keeps soldiering on, and we're all the better for it.


Now CRM is offering all of its issues from 1990 to present--116 altogether--on DVD.

This is perfect for those who need to downsize, but don't want to give up all their issues, or for those who are interested in the more recent history of the hobby in Canada.

Cost is $69.99 before Nov. 15, $89.99 after that date.

Click here to order your DVD today!