Sunday, December 27, 2009
Easy Numberboards For HO Scale Diesels
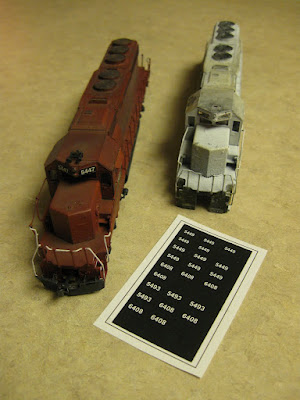
A sheet of numberboards, with some ready
to be applied to the unit on the right; the unit
on the left has already received its numbers.
Over the years, I have tried various methods to make numberboards for my HO scale diesel units. I cut tiny decal numbers into small pieces, then tried--usually in vain--to affix them to the unit in an even and straight line. I tried CDS dry transfers--it was twice as hard to get the spacing right and make it even, not to mention trying to hold the dry transfer sheet on to the front of the cab. I was sure there had to be an easier way.
There is, and it is found right in your computer. All you need is a word processing system, such as Word (for those of us who use PCs). Here's how I make white on black numberboards (the most common kind).
After opening up a new page, create a text box. Go to Format, and click on borders and shading. Click on shading, select the darkets black available and use it to fill the text box. Next, go to Font Colour, select white, and then key in the numbers you want. As for the font itself, you need to consult the prototype; I use Arial (sans serif) for my CP Rail units. For size, I use 8 or 9 point.
After printing the text box, use scissors or a hobby knife to cut out the numberboards to fit the lens area on the cab; I cut small angles on the corners so they fit properly. Next, use a black felt pen to blacken the edges. Test fit and, when ready, dab a bit of white glue on the clear lens on the unit. After affixing the numberboard, you can gently slide it into position while the glue is wet. The same method can be used for numbers on the rear of the unit.
If you want, you can paint the lens black before gluing to make sure nothing clear shows through on the edges; a black felt pen can also be used after the numberboard is affixed to cover anything the paper misses.
That's it--an easy way to get good-looking, straight and even numberboards.
Sunday, December 20, 2009
A Tour Of The CP Rail Manitoba & Minnesota Subdivision, Part 2
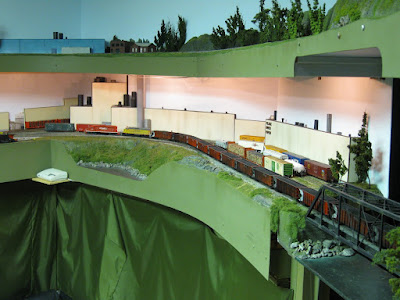
In the previous post (below and at http://cprailmmsub.blogspot.com/2009/12/tour-of-cp-rail-manitoba-minnesota.html), we started our trip on the lower level of the CP Rail M & M Sub. This next post starts the journey up to the second level. The trip between the two staging yards takes about 9 minutes.
For reference, view the track plan below (or at http://cprailmmsub.blogspot.com/2009/12/cp-rail-manitoba-minnesota-subdivision.html) There is also an overview video of the layout on YouTube at http://www.youtube.com/watch?v=BrkeyhOKBYk.
Part 2 of the tour starts with a look back around the penninsula towards Fort Frances (across the aisle).
The train emerges from a tunnel on the other side of the penninsula, headed toward the storage room and the first part of the "helix." I put the word "helix" in quotation marks because it is not a traditional circular helix; instead, it travels around the edges of the 5 x 11 storage room.
The tracks cross the door into the storage room on a drop-down leaf; you can see the tracks on the other side where the train started its trip upgrade. You can also see the middle level of the "helix," which no longer has any tracks. At one time, the tracks went around this room three times to gain elevation--a trip that took just over two minutes. Two minutes isn't long in real life, but it's an eternity in model railroad terms; I grew impatient waiting for the train to emerge back on the layout. So I "daylighted" the middle level, bringing the track back out on to the visible portion of the layout.
The train emerges back in the train room, having risen up and over itself and doubling back towards the end of penninsula. This is the only part of the layout that is "insincere" (two tracks in the same scene). Otherwise, the layout is single-scene throughout, with right always being east and left west (looking north). The town of Ritchie, Man. can be seen on the upper level; below the tracks you can see the tethered walk-around throttle system used on the layout.
Another view of the "daylighted" portion of the layout, looking back toward the storage room. Although an afterthought, this area has become one of my favourite scenes to watch and photograph trains.
After going through a short tunnel, the train emerges on the other side of the penninsula on a new middle deck. Daylighting the middle level of the "helix" posed a unique challenge on this side since I didn't want to have it part of the Fort Frances town scene. The answer was to make a very narrow, unobtrusive shelf--it's only four inches wide. Through judicious use of background photos, it actually looks much deeper. This same scene can be seen in Tony Koester's book Designing and Building Multi-Deck Model Railroads (Kalmbach). Check it out at http://www.kalmbachstore.com/12434.html
After going back into the storage room and gaining some of the remaining elevation, the train emerges back in the layout room between two tunnels. The scene below is where the train first emerged on to the layout from the lower level staging yard. This scene also really shows the difference between floursecent lighting (top) and incandescent (bottom--I use old Christmas lights to illuminate parts of the lower level).
After going through yet another short tunnel, the train crosses the entry to the layout room. At this point, the track is 61 1/2 inches off the floor; the nod-under is 59 inches high (you just need to duck your head to come into the room).
A view looking the other way, towards the town of Nance, MN. The Peace River Paper mill is below. Nance is also where CP Rail interchanges with the Peace River Northern, a shortline that serves an off-line paper mill and other industries.
A view of Nance, MN, which is located above the eastern part of Fort Frances, ON. Nance has a small yard, where CP Rail interchanges cars with the shortline Peace River Northern. Nance stands in for the real-life town of Warroad, MN, and the Peace River Northern stands in for the real-life Minnesota Northern. The Peace River Northern is a nod in the direction of long-time model railroader Jan Gleysteen, who had a layout of the same name in the 1950s and 60s.
Leaving Nance, the tracks head upgrade above the town of Fort Frances. The upper level is only 12 inches wide; it is made from two inch extruded Styrofoam supported off the walls.
Looking west toward Turney, Man., with Fort Frances below. Just before Turney the CP Rail tracks pass under the CN mainline, a situation that mimics Rennie, Man., where the real-life CN and CPR mainlines cross.
The tracks sweep around past Turney, which is named after my friend Morgan Turney (editor of Canadian Railway Modeller magazine; check it out at http://www.cdnrwymod.com/). The curves on the layout are all 30 inches in radius or larger, except for one curve of 26 inches radius (mostly hidden in a tunnel).
The train comes to a rest in Ritchie, Man., named after my friend Rick Ritchie. From here the train goes into the storage room, completing its journey in Winnipeg--actually the upper level staging yard.
That's the tour--hope you enjoyed the trip! You can see the layout in action on my YouTube channel at http://www.youtube.com/jdl562000
Saturday, December 19, 2009
A Tour of the CP Rail Manitoba & Minnesota Subdivision, Part 1
I enjoy taking close-up photos of the CP Rail M & M Sub. It's great to try to take pictures that approximate "real life." But sometimes its good to step back and get a larger perspective of the layout--to see how it fits into the whole layout room, how trains get from one scene or level to the other.
With this post, you can take that step back and take a tour of layout as you follow a coal train from the lower to upper staging levels. For reference, view the track plan below (or at http://cprailmmsub.blogspot.com/2009/12/cp-rail-manitoba-minnesota-subdivision.html) There is also an overview video of the layout on YouTube at http://www.youtube.com/watch?v=BrkeyhOKBYk.
But first, a note about the layout: The CP Rail M & M Sub. is a fictitious line that represents the real-life CN line from Winnipeg to Thunder Bay, Ont. and Duluth, MN, via Fort Frances, Ont. On the real line the tracks make their way south and east from Winnipeg, dipping into the U.S. at Warroad, MN, coming back to Canada at Fort Frances, Ont., and then heading south again through International Falls.
On my model version, Thunder Bay and Duluth are represented by the lower staging yard; Winnipeg is on the upper staging yard. This trip begins in the lower staging yard, below.
The train emerges into the layout room from the storage room that holds the staging yards and mainline dispatcher's panel.
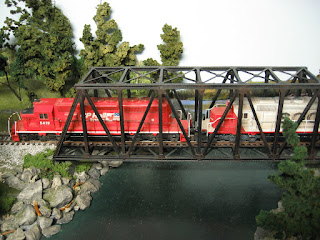
It goes through a wall and crosses the entrance to the layout room on a swinging bridge. The river below represents the Rainy River that marks the dividing line between the U.S. and Canada. The upper level is a nod-under; you just have to duck your head down a bit to gain entrance to the layout room.
After crossing the river, the tracks pass the Peace River Paper mill--the largest industry on the layout with five spurs, a two-track yard, a passing track and its own switcher. The mill is scratchbuilt our of styrene. The curtains hide shelves beneath the layout. The town of Nance is on the upper level above the mill.
It then swings past the engine terminal; the half-circle in the foreground is the old now filled-in turntable pit. I use a mirror to double the length of the spur into the mill (centre of the photo).
Heading into Fort Frances, with a better view of the old turntable pit.
All trains stop in Fort Frances to change crews. Cars for various destinations, and for local industries, are taken off and added here.
Leaving Fort Frances, the train sweeps past the only unfinished part of the layout. My small work table is tucked under the benchwork. That's Turney on the upper level to the right. The dispatcher's panel for the yard is on the lower right.
Leaving Fort Frances, the tracks curve around the outer edge of the penninsula. That's the engine terminal on the right, the paper mill directly ahead.
Next: Heading up into the "helix" and on to the upper level. Click here to read and see it: http://cprailmmsub.blogspot.com/2009/12/tour-of-cp-rail-manitoba-minnesota_20.html
With this post, you can take that step back and take a tour of layout as you follow a coal train from the lower to upper staging levels. For reference, view the track plan below (or at http://cprailmmsub.blogspot.com/2009/12/cp-rail-manitoba-minnesota-subdivision.html) There is also an overview video of the layout on YouTube at http://www.youtube.com/watch?v=BrkeyhOKBYk.
But first, a note about the layout: The CP Rail M & M Sub. is a fictitious line that represents the real-life CN line from Winnipeg to Thunder Bay, Ont. and Duluth, MN, via Fort Frances, Ont. On the real line the tracks make their way south and east from Winnipeg, dipping into the U.S. at Warroad, MN, coming back to Canada at Fort Frances, Ont., and then heading south again through International Falls.
On my model version, Thunder Bay and Duluth are represented by the lower staging yard; Winnipeg is on the upper staging yard. This trip begins in the lower staging yard, below.
The train emerges into the layout room from the storage room that holds the staging yards and mainline dispatcher's panel.
It goes through a wall and crosses the entrance to the layout room on a swinging bridge. The river below represents the Rainy River that marks the dividing line between the U.S. and Canada. The upper level is a nod-under; you just have to duck your head down a bit to gain entrance to the layout room.
After crossing the river, the tracks pass the Peace River Paper mill--the largest industry on the layout with five spurs, a two-track yard, a passing track and its own switcher. The mill is scratchbuilt our of styrene. The curtains hide shelves beneath the layout. The town of Nance is on the upper level above the mill.
It then swings past the engine terminal; the half-circle in the foreground is the old now filled-in turntable pit. I use a mirror to double the length of the spur into the mill (centre of the photo).
Heading into Fort Frances, with a better view of the old turntable pit.
All trains stop in Fort Frances to change crews. Cars for various destinations, and for local industries, are taken off and added here.
Leaving Fort Frances, the train sweeps past the only unfinished part of the layout. My small work table is tucked under the benchwork. That's Turney on the upper level to the right. The dispatcher's panel for the yard is on the lower right.
Leaving Fort Frances, the tracks curve around the outer edge of the penninsula. That's the engine terminal on the right, the paper mill directly ahead.
Next: Heading up into the "helix" and on to the upper level. Click here to read and see it: http://cprailmmsub.blogspot.com/2009/12/tour-of-cp-rail-manitoba-minnesota_20.html
Friday, December 18, 2009
CP Rail Manitoba & Minnesota Subdivision Track plan
One question that comes up occasionally is a request for a trackplan. Below find one that appeared in an article about my layout in Railroad Model Craftsman.
It's not perfect--some spurs are missing, and the door doesn't open into the layout room as shown on the track plan. And since it was created, I dismantled the upper level on the middle peninsula. But it gives a good idea of what the layout looks like.
An overview: The layout is in a 17 by 21 foot shaped room. The "helix" (where the track climbs over itself twice to gain elevation) is in a storage room that measures 5 by 11 feet.
That's also where my two six-track staging yards are, representing Winnipeg on the upper level and Duluth and Thunder Bay on the lower level.
Wednesday, December 16, 2009
NMRA Thousand Lakes Region Convention, May 28-30, Winnipeg, Manitoba
Every five years or so, Winnipeg plays host to the NMRA Thousand Lakes Region annual convention. The next one will be in the city May 28-30, 2010.
Called Steam on the Prairies, the convention will feature clinics; tours of 15 or more local home and club layouts (including the CP Rail M & M Sub.); and a railfan trip to nearby Portage la Prairie, where the CPR and CN transcontinental mainlines cross at grade. (Rated by Trains magazine as one of North America's 10 best railfanning locations; see photos at www.youtube.com/watch?v=o7TjFf3TKg4.)
The crossing at Portage la Prairie
There will also be an opportunity to ride the Prairie Dog Central (http://www.pdcrailway.com/), one of the oldest regularly scheduled vintage operating trains in North America. The train is pulled by a beautifully restored 1882 4-4-0 steam locomotive.
The Prairie Dog Central
The convention also includes a BBQ and rides on Bill Taylor's Assiniboine Valley Railway, a 1:8 scale "backyard" layout (see more at www.swedenfreezer.com/avr/index.htm). There will also be two operating sessions.
A freight train on the AVR.
An AVR "passenger" train.
AVR trackplan.
For more information about Steam on the Prairies, go to www.thousandlakesregion.org/pages/conventions.html.
Wednesday, December 9, 2009
Railfanning at Rushing River
One of my favourite railfanning locations on the CP Rail Manitoba & Minnesota Subdivision is by the bridge over the Rushing River. Below find a few shots from a recent visit, along with some information about how I made the "water." (Bottom of blog post.)
The "water" in the Rushing River is made with Ceramcoat, a hobby paint sold in craft stores. I use two colours: Black-Green and Deep River Green (Black-Green in the middle, Deep River Green on the edges). Gloss Medium was used to give the water a shiny look.
The riverbed itself is a piece of hardboard. I made a dam behind the bridge to hide the benchwork; a photo, cut out of a calendar, gives the scene a bit of background depth.
The bridge itself is made by Atlas (I think); I bought it used (it was silver) and painted it black. The abutments are made from extruded Styrofoam.
Wednesday, December 2, 2009
Modelling the Transition Era on the Manitoba & Minnesota Sub.
When people ask what era I'm modelling, I tell them: "The transition era."
No, not that transition era--the time when diesels were replacing steam locomotives in the 1950s.
I'm talking about the early to mid-1990s, when newer power like the AC4400s and the SD70s and 80s were beginning to appear on the scene, challenging the ubiquitous SD40-2s.
The CP Rail Manitoba & Minnesota Sub. is set in the early 1990s, with a cut-off date of 1995. Almost all the mainline power on the layout are SD40-2 units; two new AC400s are the only sign of changes to come.
For me, the SD40-2 is what railroading is all about; the newer units, for some reason, leave me cold--they are big and imposing, but souless, in a way I can't describe.
(I wonder if this is how model railroaders of the previous generation felt about diesels?)
At first, I thought the newer power was the ugliest thing I had ever seen. I've gotten used to them by now. But it still is special to see an SD40-2 in a consist when out railfanning.
The real world may have moved on to newer power, but in my basement the SD40-2 still rules. I wouldn't have it any other way.
Subscribe to:
Posts (Atom)