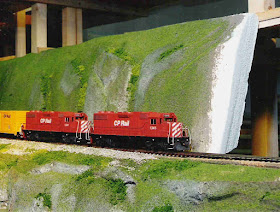
A piece of Styrofoam on its edge during
construction on the M & M Sub.
Many people who use Styrofoam for scenery usually do it sandwich style—putting one layer of foam on top of another, and then carving landforms out of it. That method works, but it’s not the only way to use Styrofoam.
Another way to use this versatile material is by standing it on edge, as seen in the photo above. Not ony is this an excellent way to cover large areas, it also allows you to create sharply inclined hillsides in areas where space is at a premium. Plus, there's no need to worry about hiding cracks between the layers, if they show up.
For this way of making scenery, I used two-inch thick Styrofoam. You need to begin by cutting an angle on the bottom, matching the angle you want to achieve with the hillside or cliff you want to create. At the top, you can also cut an angle, matching the wall or area the Styrofoam leans against. (Depending on the angle of the hillside.)
To hold the Styrofoam in place, I used white glue and screws. I put glue on the bottom and top surfaces, and then screwed the Styrofoam to the benchwork. (The screws can be removed later, after the glue dries). Gaps between the sheets were filled with cheap spackling paste, then sanded. After that, I carved it, then added rock faces, paint and ground foam.
You can also use the Styrofoam standing straight up, as in the photo at the bottom of this page. In this case, I needed to create a view block on a narrow ledge to hide where the Peace River Northern shortline sneaks off behind the scenery. I simply carved the Styrofoam to the needed contour, glued it to the subroadbed, then painted it and added gound foam.
Unlike the sandwich method, which requires you to glue a number of sheets on top of each other to reach the desired height, this method enables you to cover a lot of area with less work.

The same area, after the scenery is finished.

The vertical viewblock on the upper level.
Hi! Just found your blog & love it. Great pics.
ReplyDeleteI've used this trick myself, works great: http://picasaweb.google.com/tracy.mckibben/NewLayout#5326219656545573810
ReplyDelete