Friday, December 31, 2010

Going, Going, Gone . . .

From this . . . 

To this.


Going, going—no, it’s not all gone. But part of the CP Rail Manitoba & Minnesota Subdisivion is. I took down the centre peninsula this past week.

Why? It’s partly because of changing family circumstances; my daughter started university in fall, and we moved her room downstairs to give her more space and privacy. She moved into my old office, which left me without my own work space. The train room couldn’t accommodate a desk and fold-out guest couch—at least, not with the peninsula in the way.

But the other reason was that, for me, there’s nothing worse than a finished layout. As I think I have mentioned before, I enjoy building a layout more than running one (even though I like running trains). Taking down part of it gave me something to do on the layout, and will also give me some projects as I reconnect tracks and fix up scenery. Plus, it might make the layout better suited for operation—we’ll see.

There are losses, of course—gone are a couple of signature scenes, and some scenery I was fond of. But I took many photos before dismantling that area; together with videos of the layout (available at http://www.youtube.com/user/jdl562000), I will have lots of memories.

Plus, nothing lasts forever, as I noted near the beginning of this blog when I wrote about Tibetan Sand Mandalas and Model Railroading. 

What's always amazing is how little time it takes to dismantle something that took years to build. A few hours after I started, all the track and scenery was gone. Over the course of a few days I unscrewed the benchwork. The photos below show the process.

Update: Much work has been done since this post; click here to see what the room looks like now.


Buildings & trees removed


Track gone


Fascia gone, scenery coming off


Getting down to bare wood


Nothing left but L-girder benchwork

Wednesday, December 22, 2010

Merry (Boxcar) Christmas!


This Christmas box car was painted by Rei Alvarez, an artist in Austin, TX for the Balcones Recycling Company. The car is owned by the Texas and South Eastern Railroad. (#5096)

Alverez specializes in big murals; he painted the car this fall. He says on his blog that the car will be used on a Christmas card, too.

The photo on top is from Edgar Romero Roldán; the other two below are from Alvarez's blog. (http://rei74.blogspot.com/2010/10/balcones-recycling-austin-tx_20.html)


Friday, December 17, 2010

Private Collection for Sale


Dale Edwards is the owner and founder of Kadee Products. He is selling his complete collection of every HO Car that Kadee has made up to November, 2010. This collection includes all of the prototypical cars, collector/specialty series cars, and special run cars. There are 558 cars in all.

It can be yours for only $18,000. Well, that's the starting bid, anyway.

Check it out: http://cgi.ebay.com/Kadee-HO-Cars-COMPLETE-private-collection-/180601032070?pt=Model_RR_Trains&hash=item2a0ca90d86

Monday, December 13, 2010

Derailment Caught on Video


What are the chances of catching a derailment on video? That's what happened to a railfan in Metairie, LA in October.

The 91-car CSX train was headed to the yard when six cars near the front came off the tracks.

The derailment occurs 3:41 into the video. Check it out at http://www.youtube.com/watch?v=03Nq632eV6I&feature=player_embedded

Saturday, December 11, 2010

Top Events of the Past Decade


Rapido's Angus Van: One of the Top events of the decade.
As the decade (2000-2010) comes to a close, there’s a discussion on the Atlas HO forum about the top events of the past ten years. So far, here are some of the things that have been mentioned, and some that seem important to me (in no particular order):

The demise of kits. (Anybody buy a blue box car recently?)

The end of scratchbuilding. (See item above; when you can even buy buildings that are put together, who needs to build anything any more?)

Sound becomes standard. (Although not yet on the CP Rail M & M Sub., unless you count the sound of Athearn blue box locomotives.)

The model railroad magazine industry shrinks. (Circulation is down, and we said goodbye to Railroad Model Journal and Model Railroading. Meanwhile, we said hello to Model Railroad Hobbyist, an online-only “magazine.” Is that the future of model railroad magazines?)

Consolidation in the model railroad industry. (Horizon buys Athearn & Roundhouse, Walthers buys LifeLike.)

The end of horn hook couplers. (Now that all rolling stock comes with Kadees of Kadee clones, what am I going to do with all those packages of #5 Kadee couplers?)

The Union Pacific licensing issue. (Who knew we were infringing on copyright?)

The closing of hobby shops. (When’s the last time you bought something at one?)

DCC becomes mainstream. (One day I just might buy a system.)

The entry of Rapido Trains into the model railroad market. It instantly raising the bar for passenger cars and other rolling stock. (And let’s not forget ExactRail, either.)

The growth of model railroad forums. (For good or ill—mostly good, in my opinion, but there are some flame wars I can do without.)

Limited runs. (Buy now or forget it.)

Here in Canada, I would add the birth of the Canadian Association of Railway Modellers (CARM), created in 2003; the growing number of Canadian items in the model railroad marketplace (including the great models made by Rapido); the shift in the model railroad world from Toronto, which used to boast the largest model railroad show in the country, to Calgary and Edmonton, which currently host the largest shows; and the continuing success of Canadian Railway Modeller, which continues to publish six issues a year out of a home office.

Also in Canada, but on non-model railroad note, would be the CPR's steam program, and its holiday train, which highlight railroading in significant ways for many Canadians.

What would you add to the list?

Friday, December 3, 2010

On Photography, or the Amazing Modelling of Josef Brandl


Is it real, or is it . . . .

Sometimes someone will exclaim, hyperbolically, about how a model railroad photo looks "real." They almost never do, of course, even if the modelling is superb; there is always something that gives it away—the size of the handrails, couplers, track and ties; the static, expressionless figures; the trees and bushes; the backdrop, or something else.

Don’t get me wrong—I appreciate great model railroad photography. I aspire to take great photos of my layout. But photos, by their very nature, militate against good modelling. They force us to do exactly what we shouldn’t do when looking at a layout: Look intently, and with a singular focus, at a single scene.

Model railroads are best viewed following a train around a layout. When we do that, our brains fill in the gaps, based on what we see in our peripheral vision. Our brains tell us that the scene the train is passing through keeps going and going into the background; a closer inspection would reveal that it is only a cut-out from a magazine or calendar taped against a wall.

It’s all about illusion, in other words—sleight of hand, or sight, in this case, diverting our attention away from the areas that would spoil the fun and show us that it is, in fact, only a model.

Occasionally, however, a photo rises to the top. The modelling is so amazing that we actually do the proverbial double-take. Often, these are highly detailed micro-scenes; it would be rare for someone with a model railroad to devote that much attention to the whole layout—a “good enough” philosophy is all that is really possible, unless the owner has lots of time, skills or money (to hire a professional layout builder).

One person who seems to have two of those attributes—time and skills—is Josef Brandl.

I had never heard of him either until recently, while I was browsing model railroad photos on Google images. That’s when I came across the photos below.

This German model railroader is a professional layout builder. He is one of the best modelers I have ever encountered, when it comes to scenery.

As the marketing copy for his book, Almost Real: Josef Brandl’s Amazing Model Railroads puts it: “According to a not unfamiliar story, the Creator laboured for six days to create heaven and earth, and on the seventh day he rested. This book is devoted to world’s in miniature, created by Josef Brandl in 30,000 hours of work.”

Enjoy the photos. If you want more info about the book, go to http://www.einsatz-verlag.de/index_en.php You can also download a different chapter each month from that website.


A few photos from a calendar featuring Brandl's work . . . .


Thursday, November 25, 2010

Realistic Looking Windows


The finely-detailed (and realistically fake) interiors
on the M & M Sub. Those are real venetian blinds and
curtains in the second floor windows.

My hat is off to those who meticulously detail the inside of their model buildings—tables, chairs, machinery, people and so much more bring the interiors to life. I am amazed by their craftsmanship.

But what if you lack those kind of skills, as I do? Or if your buildings are mostly flats against a wall?

That’s the case for me, and for the CP Rail Manitoba & Minnesota Subdivision. Of the over 50 buildings on my layout, only 15 are modelled in three dimensions. The rest are a half-inch deep or less—no room for modelling an interior, even if I wanted to (or could). What to do?


An overall view of the DPM kit with the real windows.

Fortunately, the prototype, as usual, has an answer.

The next time you are driving downtown during the daytime, look into the windows of various buildings on either side of the street. How far inside can you see? Two to three feet, at best, even if the lights are on. After that, it’s just dark.

When I made this discovery, it completely changed the way I thought of modelling building interiors. I realized I didn’t need to worry about making detailed interiors. I just needed to show the first few feet of the inside of the buildings.


A close-up of the windows on two of the buildings; you
can only see in a few feet. Signs on the windows lend
a nice touch.

But how to replicate the prototype? My solution was to take use the real thing by taking photos of building windows. Through a bit of trial and error, I found that I could make HO scale-size windows by standing on the opposite side of a two-lane road (with two lanes for parking) and photographing a building on the other side. After developing the photos (use the glossy format for the best results), I cut out the windows and taped or glued them to the back of my building flats. (There is no clear glaze or plastic in front of the photos.)

Of course, with digital cameras and photo-imaging software, the guesswork can be taken out of this process; I developed it before such fancy gizmos became readily available.


Another close-up; neon signs also show up nicely
using this method, as do posters and plants.

In addition to seeing “inside” a building, you can also get the signs and posters that proprietors place on the windows, along with the curtains, venetian blinds and other window treatments behind them—no need to add those, since they come free with the photographs.

In other words, nobody can look at these buildings and say they don't look real; they are, after all, the real thing!


Even the green double door on the building on the right
is a photo! Note how you also get grafitti using this method.


Mannequins in shop windows look great, too.

Friday, November 19, 2010

Staging Yards on the CP Rail Manitoba & Minnesota Sub.


The upper and lower staging yards on the M & M Sub.
That's Thunder Bay/Duluth on the bottom, Winnipeg
on the top. The "helix" can be seen between the two yards.

The first rule of model railroading staging is this: You never have enough.

Oh, sure, you may think that you have enough at the start. But you will soon discover it's woefully inadequate.

That was the lesson I learned the hard way on my first layout. I thought two staging tracks would be enough. Not!

Since the staging on that layout was hidden, I ended up adding additional staging from below the layout—not a practice I recommend. Do you have any idea how hard it is to lay track by feel, in the dark, with your hands above your head? It's not any fun at all.

Eventually, I added six additional staging tracks on that layout. And yet, more locomotives and rolling stock kept appearing. It wasn't long before they were filled, too.

I decided not to repeat that mistake on the CP Rail M & M Sub. The point-to-point layout is fed by two six-track staging yards. (Both visible, thank-you; no more hidden staging for me.) The upper level yard represents Winnipeg, and points west; the lower yard represents Thunder Bay, Ont. and Duluth, Minn. and points east and south.


Another view of the staging yards, which are located
in an adjacent storage room. The trains cross the door
on a drop-down bridge; the control and dispatcher's
panels are across the room.

And yet, even that turned out not to be sufficient. Just as with the first layout, more locomotives and rolling stock appeared. (Where does that stuff come from, anyway?)

It was impossible to add more tracks to the staging yards, so I added a third passing siding in Ritchie, Man., a town on the upper level, and a fourth siding in Fort Frances, Ont., on the lower level. Both of these tracks provide open staging for trains.

As for the staging yard tracks themselves, they are controlled by RETC: Ridiculously Easy Track Control. They are all wired into a single block. Track power is thrown through use of cheap light switches; one track is wired through the switch, which is wired to the block control.

Turn the switch on and the track has power. Turn it off, and it's dead. That was easy!

Since the tracks are are stub-ended, I also needed a way to stop trains automatically. A simple dead track accomplishes that; an insulated joiner on one track stops the locomotives dead.

Even though all of my trains are pulled by two units, this isn't a problem; momentum carries the second unit across the gap, which powers the track, and they both roll until the second unit enters the dead track. They they both come to a stop before the end of the track.

Simple, and cheap. Which, as I always say, is good enough for me.

Sunday, November 14, 2010

A Signature Scene on the M & M Sub.


SD40-2 6027 leads a train downgrade on the CP Rail
M & M Sub. That abutment is more than decoration;
it keeps the ballast on the track!

One of the signature scenes on the M & M Sub. is the steep cliff at the entrance to the layout room. The track at this point is 15 inches above the "water" in the lake below, and 4 1/2 feet off the floor.

Ironcially, this scene wasn't in the original plans. It only appeared when I decided to "daylight" one level of the helix (in the adjoining storage room). When I brought that level out to the layout room, I had to run it up and over and alongside the lower level track. The result is what you see here.


The scene under construction, #1. I used L-girder
benchwork. Two-inch thick Styrofoam was used as
subroadbed on the upper level.

The basic landform was shaped by placing two-inch thick Styrofoam vertically against the benchwork. After patching the cracks with cheap spackling paste, I added tree bark to make the "rocks." A mixture of gray and brown latex paint, ground foam and foliage completed the scene.


The scene under construction, #2: The Styrofoam has
been added, along with the tree bark.

The small brick abutment alongside the track is more than just decorative; it proved necessary when the ballast refused to stay on the side of the track!


An overall view of the completed scene. That's the
town of Ritchie on the top level.
Some people worry when they see trains that high off the ground, with nothing to prevent them from tumbling over the cliff. But in over a dozen years of operation, I have never had an accident at this spot.


A view from above, showing the "water" below.

Friday, November 12, 2010

The Future of Railroad Magazines


How do you like to read magazines? On paper, or on your computer?

Railfan & Railroad would like to know the answer to that question. It has posted a digital version of a recent back issue for readers to peruse; after taking a look at it, people are asked to complete a short survey about digital versus print publicatons.

They want to know: Would you subscribe to a digital version? Print? Or both?

You can check it out for yourself at http://railfan.com/digital

Monday, November 8, 2010

Who Needs a Roof?


Now you don't see it . . . the roof, that is.
One advantage of eye-level benchwork is that you don't need to worry about roof details—or even roofs at all, as seen on this as-yet unnamed industry in Nance, Minnesota.


Now you still don't see it . . . there is no roof.

Wednesday, November 3, 2010

Layout Photos Posted


I've been taking a lot of photos of the layout recently. I posted a collection of photos, accompanied by big band music, on YouTube. You can find it at http://www.youtube.com/watch?v=PQ8C5GswoLI

Saturday, October 30, 2010

Easy To Make Dispatcher’s Panel


The dispatcher's panel on the M & M. Sub. The board
below the panel controls power to the blocks; the
panel itself shows train locations.

Sometimes inspiration comes from the most unexpected places. In the case of the dispatcher’s panel for my CP Rail Manitoba & Minnesota Subdivision, it came from the fridge door.

My double-deck railway is operated by conventional DC control. The dispatcher, who controls the blocks for the mainline trackage, is located in a small room off the main layout room (the same room that holds the staging yards).

Since my layout is “dark” (unsignalled), the dispatcher gives engineers clearance by radio to move from block to block. I needed a way for him to know where each train was located, what train it was and what direction it was travelling.

Since I always want to do things as simply as possible, I sought a low-tech (e.g. cheap) solution to this challenge. That’s where the fridge door came in. If yours is anything like mine, you have all sorts of things stuck on it with magnets. Many of these are the thin magnets that come free in the mail from businesses or charities.

I was looking at the door one day when I realized they not only do they stick to metal—they stick to each other. At that moment, an idea was born.
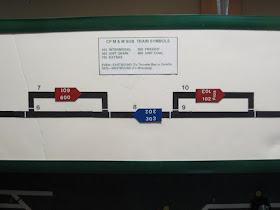

Close up of the panel, showing train numbers. The numbers
correspond to the electrical blocks, controlled by the
board below.
Here’s how it works.

I began the project by collecting as many thin magnets as I could. I got them at conventions, trade shows, from realtors (who send them through the mail), at the local baseball stadium (the team prints its schedule on a large fridge magnet), businesses and stores.

Once I had enough magnets, I cut a piece of Masonite the appropriate width and length (in my case, 34 inches long by seven inches high). I glued a piece of white foam core to it, then drew on it a schematic of my track plan. (You could also just paint it white.)

Next, I used a hobby knife to cut the biggest magnets into ¼ inch wide strips. I then glued them to the foam core with contact cement, following the track schematic I had drawn on it earlier.


To make the panel, you cut the magnet (below) into
strips and tags.

The last step was to give the panel a finished look by adding some plastic angle from the local home hardware store (the kind used to protect the corners of walls). I spray painted them with primer, then sprayed on a coat of green paint. Since the strips are self-adhering, I simply peeled off the protective paper and pressed them on to the panel.

Next, I made the train tags. Using a hobby knife, I cut magnets into rectangles roughly one inch long by ½ inch wide. Aftere that, I cut triangles out of one end to make them pointed. I then gave them a spray coat of primer on the advertising side. When dry, I spray painted them red or blue. When that coat was dry, I added the train numbers with CDS dry transfers—even numbers are eastbound, odd numbers go west.

Operations
Prior to a new operating session, I make sure the train tags line up with the trains in the staging yards or on the layout. As the dispatcher gives a train clearance from one town to another, he lifts the tag off one block and moves it to another—the tags and lines, being magnetic, stick to each other. Once a train reaches the end of the line (the opposite staging yard), the tag is flipped and it is ready to follow the train back to where it came from.

That's it; easy and cheap, and very (almost embarrassingly) low-tech. But, it works, and that's always good enough for me.
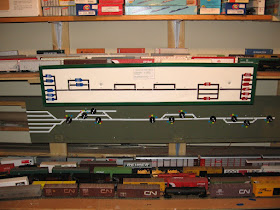

Overview of the panel. That's Winnipeg staging on
the top, Thunder Bay/Duluth staging on the bottom. The
helix is located behind the two panels.

Monday, October 25, 2010

Wouldn't You Like To Study Here?


Too late to get to class now; here comes a train!

“Sorry I’m late, professor—I was held up by a train.”

Who wouldn’t like to use that as an excuse for being late to class? Students at Goshen College in Goshen, Indiana, can—and do—get to use it on a regular basis.

The College, which dates back to 1903, is bisected by the Norfolk Southern Marion Branch, a busy mainline that sees between 8-10 trains a day.

The line was owned by the New York Central and Conrail before NS took it over; it formed the eastern boundary of the campus until 1952, when the College purchased seven acres on the other side of the tracks. Today the line divides the college campus in half, with most of the academic buildings on the west side and the music center, student housing and athletic facilities on the east.

In addition to impacting daily life on campus, the College has had to take trains into consideration when constructing new buildings; the music and arts centre, for example, had to be built in such a way so as to not only keep the music in, but keep the sound of trains out.

When graduation time rolls around, the registrar asks NS to avoid running trains during the ceremony so that commencement processionals and speeches are not delayed or interrupted by an inopportune train.


Students wait for a train to pass so they can
get to class.

The College provides safety instructions to students for crossing the tracks; to date, only one student has been hit by a train during the College’s existence. (In 2009; not surprisingly, alcohol was involved.)

Today the town of Goshen would like to move the busy branch to the edge of town, thus easing traffic congestion in the community. NS, however, doesn’t seem open to the idea; if anything, it is thinking of adding a second track to the busy line.

To lessen the impact of the tracks, the College is planning to build an underpass, allowing unfettered access between the two parts of the campus.

I was at Goshen College recently, attending a conference (and took the accompanying photos with my cell phone—sorry about the quality). The building I was in was located right alongside the tracks, with windows looking out at the line just 40-50 feet away. It was hard to concentrate on what the speaker was saying whenever a train went by.

I know that if I was a teenager again, I would certainly consider studying at Goshen College!


The last car rolls by; all clear!

(For more information about colleges with trains nearby, check out the Atlas HO forum archive at http://forum.atlasrr.com/forum/topic.asp?ARCHIVE=true&TOPIC_ID=48476 )


Looking north along the tracks that cuts
through the campus.