Thursday, September 30, 2010

Now That's a Tight Radius!


Who would believe it?

They say there's a prototype for everything. But does that include curves of 18 inch radius on a layout depicting a modern railway?

The answer is yes, as you can see from the photo above. The grain elevator is located in Portland, Oregon. Unbelievable!

Actually, that's what someone would say if they saw it on your layout. But then all you'd need to do is show them this photo for proof.

Thanks to Scott Lothes for permission to post the photo. See more of Scott's photos at http://www.railpictures.net/showphotos.php?userid=36075, or on his website at http://www.scottlothes.com/.

Sunday, September 26, 2010

The Peace River Paper Mill


A freight passes by on the mainline as the switcher
works the small yard at the Peace River mill.

I may not enjoy switching cars, but I have friends that do. The Peace River paper mill was built just for them—although I occasionally like operating it, too.

The mill occupies a space about eight feet long in one corner of the layout. When envisioning the CP Rail Manitoba & Minnesota Sub., which is set in the early to mid-1990s, I realized that it would require a few big industries—no small buildings that look like they could barely fill up one small truck on a good day, much less a whole boxcar. By the time period I am modelling, railways had long-ceased serving most of those small customers.


Another shot of the mill; the walls are styrene on foamcore.

The mill itself is entirely scratchbuilt. Which sounds more impressive than it really is; the building is almost entirely flat and possesses few details. (It exists more to give the impression of a large building, rather than really be a replica of one.)

The building is made of foamcore and Evergreen siding and strip styrene. (A lot of Evergreen siding and strip styrene . . . I kept my local hobby shop in business when buying styrene for the mill.)


Looking down the mill trackage from yard.

One feature of the complex is a mirror that makes the pulpwood receiving tracks look longer than they are.

The mill itself features a runaround track, five spurs and a two-track yard. It is served by it's own locomotive—an old unpainted Atlas S-2 that I bought used. I decided to leave it in "primer," and just re-number the unit.


S-2 #2 pulls a string of cars at the mill.

The left side of the mill is for receiving inbound recycled paper, pulpwood and chemicals. The right side is for shipping out finished product.

It can take about 40-45 minutes to switch out the mill—remove the outbound cars and replace with the inbound cars. It's great for keeping my operations-minded friends entertained. And I even operate it occasionally, too.


An overview of the Peace River paper mill.

Thursday, September 23, 2010

Operations . . . Or Not


SW9 7400 switches a car in the Fort Frances yard.

I have a confession to make: I don’t really like operations.

I have operated on friend’s layouts. It’s OK. But moving car A from industry B to yard track C has never really intrigued or intereseted me. Juggling a stack of car cards has never been that appealing, either.

I tried to make my first layout operations-oriented. I had a card for each car (colour-coded by type), a timetable, even a John Allen-like timesaver industrial area. But it always ended up that I’d rather just run trains.

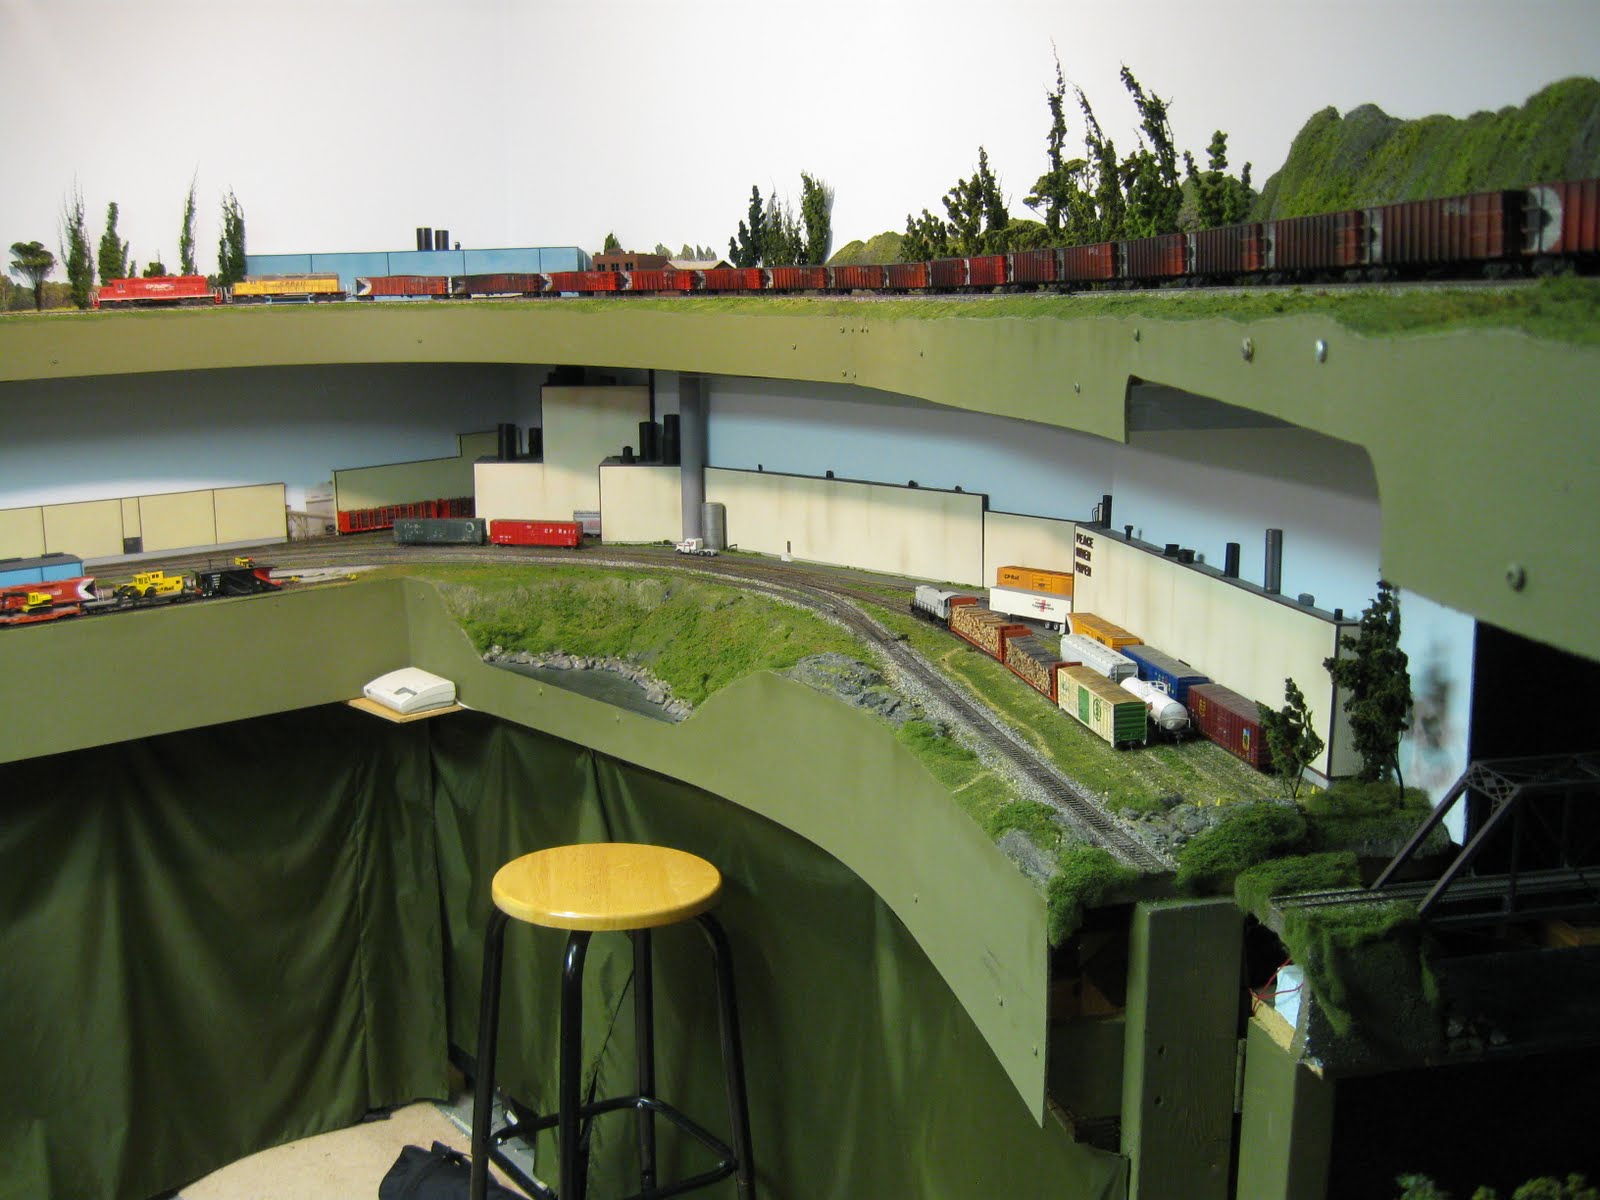
When I built the CP Rail Manitoba & Subdivision, I decided not to worry about operations. Which isn’t the same as saying the layout can’t be operated—it can. But the goal isn’t switching individual cars; rather, it’s the movement of trains across the layout.

The layout is set up to represent the coming together of two lines into one line (like a Y). One line of the two lines goes east to Thunder Bay; the other goes south to Duluth, MN. They join in Fort Frances, Ont., where a single track goes west to Winnipeg. (This is the real-life route of CN’s former Duluth, Winnipeg & Pacific line, still in operation today.)

At Fort Frances, cars from the three destinations are taken off trains and added to them. Trains are blocked so that the cars that need to be removed or added are at the rear of each consist. I use a version of Jim Heidiger’s wheel report system to keep things moving: Operators are instructed to take off or add X number of cars from each train as it enters the yard. Cars taken off of trains can be put into any yard track they want. Operators can also take off as many or as few cars if they want, too—it doesn’t matter.

I also have an interchange at Nance, MN with the Peace River Northern (PNR). Cars for the PNR are dropped off at the interchange track for the various industries in Nance and beyond. After dropping off the cars for the PNR, the local picks up the cars headed back to Fort Frances and takes them back to the yard. The next time around, those same cars are taken back to Nance and dropped off at the interchange. The cars dropped off on the previous trip are taken back to Fort Frances—and so the cycle repeats itself.

In fact, no cars ever actually gets switched at an industry, yet it seems like there is lots of action. Simple, eh?

In fact, simplicity is my goal when it comes to operations. My approach isn’t for everyone; some purists, I’m sure, would be aghast. But it works for me.

Saturday, September 18, 2010

Blogs I follow: Confessions of a Train Geek and Trackside Treasure

A couple of Canadian blogs I like to follow are Confessions of a Train Geek and Trackside Treasure.

Confessions of a Train Geek, by Steve Boyko, contains photos and posts about railways and railfanning in Canada (and, occasionally, in the U.S.) He also has pages about BNSF in Manitoba, the Central Manitoba Railway, CN in New Brunswick, Industrial Railways, the New Brunswick Southern Railway, the New Brunswick East Coast Railway, the Prairie Dog Central and VIA Rail.

You can find it at http://blog.traingeek.ca/

Another one is Trackside Treasure, by Eric. "Trips, trains and thirty years trackside with Canada's railways," he says at the top of the page. "100% Canadian Prototype Railroading. If you're looking for variety in Canadian freight and passenger railroading, with a retrospective flavour, you won't be disappointed."

You can find it at http://tracksidetreasure.blogspot.com/

Saturday, September 11, 2010

Prairie Giants


The UGG elevator at Turney, Manitoba.

Prairie giants . . . that's what the traditional wood crib elevators were called. Like giants, they were visible from a long ways away. To travellers, they were signs of civilization—wherever you saw a grain elevator, you knew there was a town. Even early aviators used them to help them navigate across the prairie provinces!

(Towns also ranked themselves by the number of elevators; if you came from a three-elevator town, you came from a big and important place.)

Since I am modelling the transition from the Canadian shield to the prairies, I needed grain elevators on the CP Rail Manitoba & Minnesota Subdivision. When I started building the layout, the only commercial kits available were much too small, so I decided to build my own.

As has been said on this blog many times before, I'm no expert craftsman or perfect modeller; my models will never win any contests. As with everything else I do on the layout, I strive for "good enough." Does it look like a prairie elevator? If yes, then it's good enough for me.

The method I like best for making elevators is to build a subframe out of foamcore, then glue on wood siding. (You could use styrene, too.) The trick is to make them big enough to be plausible—in real life, they are really tall—but not so tall as to dominate the scene.

The shingles are made from file cards, cut in strips and then cut to represent shingles.

The photos below show some of the construction process.


The elevator from the back, showing the
foamcore and the roof bracing. No back is
needed since it abuts the backdrop.


The annex from the front.

The annex from the back. No back is needed since
it abuts the backdrop.


The elevator from the front.


Before the roofs and scenery are added.


Another view of the elevator, with The Canadian
passing in the foreground.


Another elevator built using a similar
method, this one at Nance, MN.

Wednesday, September 8, 2010

The Fort Frances Yard


East end of the Fort Frances yard, with the Peace River
paper mill in the background.

People sometimes ask where I came up with my layout design. Did I use a book? It came out of my head, is the answer. But not fully-formed: The original design went through several changes—the helix moved from one place to another, and I “daylighted” a tunnel. But nothing went through more changes than the yard.


Looking west from the engine facility,

I must have laid and relaid the yard tracks a dozen times before I came up with a design that worked. I started with the mainline in the front and the yard tracks in the back, then moved the mainline to the back and the yard in front. The yard tracks began stub-ended, but ended up with switches at either end.


The Fort Frances yard, looking east.

The engine facility was on the left side, then moved to the right. Industrial spurs came and went, and I even added a fourth passing track before all was said and done.

It was almost the last section of the layout to be ballasted; I didn’t want to glue anything down until I was totally satisfied with the design.


Looking west, with the yard lead wrapping around on
the left, the intermodal facility on the right.
The way the yard works is this: Fort Frances is a junction between two mainlines—one headed east to Thunder Bay, the other south to Duluth/Superior. Trains arriving at Fort Frances drop off and pick up cars destined for other places. The yard switcher picks off the cars that are to be dropped off from the end of the train, and adds the cars that are headed out. Crews also change here, although power isn’t changed.

At the end of it all, I have a yard that works pretty well. It took a while to arrive at a design that fit the bill, but the wait was worth it.

Go to http://www.youtube.com/watch?v=TQ5MwgcUMJQ to see a video of switching action in the Fort Frances yard.


The yard trackplan, from Railroad Model Craftsman.
It's pretty close to reality.

Sunday, September 5, 2010

Dugald: A Fine Prairie Town


What could be more quintessentially prairie than a train and a grain elevator? CN 2502 and 2507, both Dash 9-44CWL units, lead a train out of the siding at Dugald, Manitoba, about 20 kilometres east of Winnipeg, on a fine morning in July, 2010.

Dugald is the site of one of Canada's worst train disasters. On this spot on Sept. 1, 1947, the westbound Minaki Campers’ Special hit a standing passenger train head on, claiming 31 lives. You can read more about the Dugald train disaster at http://www.mhs.mb.ca/docs/features/dugaldtraindisaster/index.shtml


2502 and 2507 depart Dugald for Winnipeg.

Thursday, September 2, 2010

Glint Photos


I thought these were sunset photos, until someone told me they're called "glint" pictures. (Although someone else suggested they were just backlit.) Whatever they are called, they look pretty cool to me. I took them in August along the BNSF mainline in Dillworth, MN.